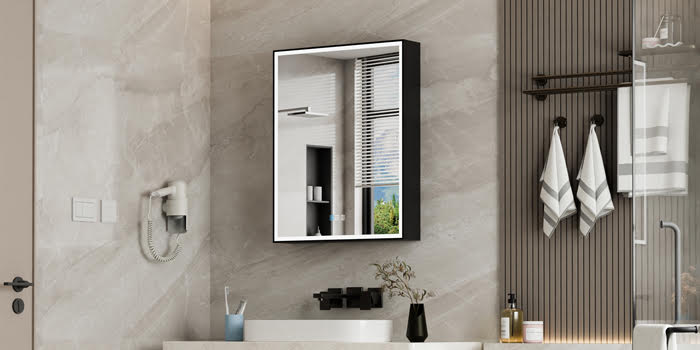
Renovating your medicine cabinet with lights is a game-changer for both style and function in your bathroom. This guide revitalizes your old cabinet, boosting its looks and usefulness. Dive into a step-by-step journey to make your cabinet both chic and efficient. A makeover for your medicine cabinet with lights means more than just a storage fix; it’s about infusing your bathroom with both charm and practicality. Follow along to discover how to enhance your bathroom’s storage game with a modern flair. Get ready to transform a simple cabinet into an essential part of your bathroom’s allure. This guide is your pathway to a sleek, functional medicine cabinet with lights that complement your bathroom’s vibe.
Assessing Your Cabinet’s Condition
Start by evaluating the current state of your medicine cabinet. Is it structurally sound? Does it only need cosmetic updates, or are there functional improvements required? Identifying these factors will help you decide on the extent of renovation needed.
Planning Your Renovation
When you plan to renovate your bathroom, assess your needs for a medicine cabinet with lights. Think about how much space you have. Measure the area where the cabinet will go. Consider what items you’ll store. Do you need more shelves for small items or space for larger bottles? Your daily routine will guide you. Look for a cabinet that matches how you use your bathroom. Size, style, and features are key. You want something that enhances the room’s functionality and fits well with your bathroom’s current layout.
Choosing Paint and Materials
Selecting the right paint and materials is crucial. Go for moisture-resistant paint suitable for bathrooms. Choose a color that matches your bathroom’s theme. For materials, if you’re adding lights, pick energy-efficient LED options. Ensure any new hardware like knobs or pulls complements the cabinet’s new look. Using quality materials ensures your renovated medicine cabinet with lights stands up to bathroom conditions and looks great.
Find here : Things to Know Before Buyig A Dining Chair For Your Home
Preparing the Cabinet
Start your renovation by preparing the medicine cabinet with lights. Empty the cabinet first. Remove any shelves or removable parts. This step is key to a smooth renovation process. It makes sure your work area is clear. Preparing well means easier steps later on.
Cleaning and Sanding
Cleaning the cabinet is your next step. Use a gentle cleaner or a fresh-scented solution like Bissell Febreze to wipe down every surface. After cleaning, sand the cabinet. Sanding helps the new paint stick better. Use medium-grit sandpaper for this job. Sand evenly across all surfaces. Dust off any residue after sanding. This prepares the cabinet for the next step. Make sure the area is dry. This helps prevent issues after renovation. Preparing the area properly is key to a successful update in your bathroom.
Priming
Applying primer is crucial. It ensures the paint adheres well and lasts longer. Choose a primer suited for your cabinet’s material. Apply the primer evenly across the cabinet. Let it dry completely. Priming not only helps with paint adhesion. It also provides a smooth base for painting. This step can’t be skipped in the renovation process.
Painting the Cabinet
When you’re ready to paint your medicine cabinet with lights, choosing the right color is key. Pick a shade that matches well with your bathroom’s style. Start with thin, even layers of paint. Allow each layer to dry fully before adding another. This method prevents drips and ensures a smooth finish. For a special touch, consider techniques like distressing or glazing. These can give your cabinet a custom look. Painting carefully transforms the cabinet, making it a standout piece in your bathroom.
Adding Lighting
Integrating lighting into your medicine cabinet with lights elevates both its functionality and aesthetic. Lighting not only illuminates your bathroom but also enhances the usability of the cabinet. It makes finding items easier and supports tasks like applying makeup or shaving. Adding lighting is a step towards a more modern and practical bathroom.
Choosing the Right Lights
Selecting the ideal lights for your medicine cabinet with lights is crucial for enhancing its functionality and aesthetic. LED lights stand out as the top choice. Their energy efficiency and long life span make them cost-effective and sustainable. When picking lights, aim for balance. Bright, clear lights improve visibility but should not be harsh. The color temperature significantly affects the ambiance. Warm lights add coziness to the space. Cool lights mimic the clarity of daylight, which is ideal for precision tasks like applying makeup or shaving. Think about your daily routines. This will guide your decision, ensuring the lighting meets your practical needs while complementing your bathroom’s style.
Installing Lights
Installing lights in your medicine cabinet with lights requires careful planning. If your cabinet comes pre-equipped with lighting, follow the manufacturer’s instructions for installation. For DIY lighting additions, ensure you understand how to safely wire the lights, considering the bathroom’s moisture levels. Always prioritize safety consulting an electrician for wiring can prevent potential hazards.
Customizing Your Storage
Maximizing the functionality of your medicine cabinet with lights involves thoughtful organization. Customizing the interior allows for efficient use of space and easy access to daily necessities.
You can create tall spaces for bottles and lower ones for smaller containers. Adjusting shelves helps utilize every inch of your cabinet effectively. It means you can store a wide range of products neatly. This adaptability makes your medicine cabinet with lights a versatile storage solution in your bathroom.
Final Touches
The final touches bring your medicine cabinet with lights project to completion. This phase is about ensuring durability and adding personal flair. It’s where practicality meets style, making your cabinet not just functional but also a highlight of your bathroom’s decor.
Sealing and Waterproofing
Ensuring your medicine cabinet with lights stays durable involves proper sealing. Use silicone sealant along its edges. This step blocks moisture entry, safeguarding against water damage. In humid bathroom settings, this waterproofing measure is vital. It maintains the cabinet’s quality over time, guaranteeing long-term service. Applying sealant not only protects the cabinet but also enhances its functionality and appearance by preventing moisture-related issues. This preventive action keeps your medicine cabinet with lights in prime condition, ready to meet your storage needs efficiently for many years.
Decorative Elements
Adding decorative elements to your medicine cabinet with lights personalizes the space. Think about a mirror with an eye-catching frame or unique light fixtures. These details bring elegance and character, making your area feel welcoming. They also spark conversations with visitors, adding life to every gathering.
Conclusion
Renovating your medicine cabinet with lights revitalizes your bathroom. This guide has walked you through each step to update your cabinet, blending style with functionality. Such renovations enhance not just the look but also the practical use of your bathroom. It turns an old cabinet into a modern, efficient storage area. This project is a mix of creativity and functionality. It shows that small changes can greatly affect your bathroom’s feel and functionality. With these upgrades, you optimize your space. You get storage that fits your needs and lighting that brightens your routine. A medicine cabinet with lights not only organizes your space but also adds to the room’s overall atmosphere. Renovating this essential piece can transform your bathroom, tailoring it to your lifestyle and preferences.